English
 Français
Group administrators can go to https://dynamicbrain.brainhq.com and log in to their accounts to access their group portal. Once logged in, there will be three tabs located at the top of the website: Training, Progress, and Groups:
![]()
Click on “Groups” to go to the Group Portal.
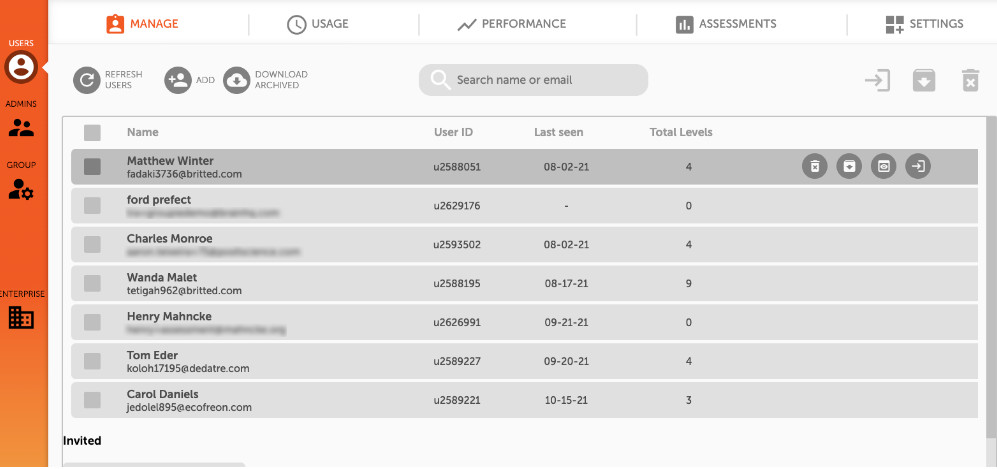
The Manage tab allows administrators to view all of their group members (excluding other admins), add new members, archive members, download archived member information, remove users from the group, impersonate users, and move users to different groups. Admins can also quickly view User IDs, when each user last logged in, and how many total levels they’ve completed.
![]() Refresh Users Click this button after adding, archiving, or removing a group member. This will update the active user list. This button is available on all sub-menu tabs.
Refresh Users Click this button after adding, archiving, or removing a group member. This will update the active user list. This button is available on all sub-menu tabs.
![]() Add User Click this button to add a new user to the group, or to send an invitation to an existing BrainHQ user to join the group. The admin will need to provide the users First Name, Last Name, email address, and create an account password for them. If adding an archived user back to the group, this also functions as a password reset for that user’s account.
Add User Click this button to add a new user to the group, or to send an invitation to an existing BrainHQ user to join the group. The admin will need to provide the users First Name, Last Name, email address, and create an account password for them. If adding an archived user back to the group, this also functions as a password reset for that user’s account.
Please note that there are a few password requirements when registering new users:
- Passwords need to be between 8 and 20 characters long
- Passwords cannot contain any part of the users first name, last name, or email address
- Passwords cannot contain common passwords such as "password", or "passcode"
- Passwords cannot contain words pertaining to BrainHQ, such as "brainhq", "cognition", "brain", or "training"
![]() Download Archived Click this button to download a report containing User IDs, email addresses, and names of any users that have been archived.
Download Archived Click this button to download a report containing User IDs, email addresses, and names of any users that have been archived.
![]() Archive Users Archiving users will allow administrators to temporarily remove a user from the group. An archived user will not be granted access to BrainHQ through a group license, and their progress will be removed from reports. However, they will still have access to a basic BrainHQ account, and can continue their training independent of the group. They can be added back to the group in the future using the Add User button. To archive a user, click the checkbox next to the user’s name in the list of users. Admins can select as many accounts as they’d like. The Archive button will turn from light gray to dark gray once a valid selection has been made. Click the Archive button and confirm to archive the selected accounts.
Archive Users Archiving users will allow administrators to temporarily remove a user from the group. An archived user will not be granted access to BrainHQ through a group license, and their progress will be removed from reports. However, they will still have access to a basic BrainHQ account, and can continue their training independent of the group. They can be added back to the group in the future using the Add User button. To archive a user, click the checkbox next to the user’s name in the list of users. Admins can select as many accounts as they’d like. The Archive button will turn from light gray to dark gray once a valid selection has been made. Click the Archive button and confirm to archive the selected accounts.
![]() Remove User Removing a user will allow administrators to delete the account from the group. A removed user will not be granted access to BrainHQ through a group license, and their progress will be removed from reports. However, they will still have access to a basic BrainHQ account and can continue their training independent of the group. To remove a user, click the checkbox next to the user’s name in the list of users. Any number of accounts can be selected at once. The Remove User button will turn from light gray to dark gray once a valid selection has been made. Click the Remove button and confirm to remove the selected accounts.
Remove User Removing a user will allow administrators to delete the account from the group. A removed user will not be granted access to BrainHQ through a group license, and their progress will be removed from reports. However, they will still have access to a basic BrainHQ account and can continue their training independent of the group. To remove a user, click the checkbox next to the user’s name in the list of users. Any number of accounts can be selected at once. The Remove User button will turn from light gray to dark gray once a valid selection has been made. Click the Remove button and confirm to remove the selected accounts.
![]() Impersonation Impersonating a user will allow administrators to effectively log into that user’s account and see BrainHQ as they would see it. Please be aware that any training or settings changes made on their account while impersonating will affect the user’s record. To impersonate a user, hover over their row and look for the buttons that appear on the far right side of the row. Click the button with the eye to impersonate the user. This will open a new browser tab with a warning at the top, and the users name will be in large, bold print:
Impersonation Impersonating a user will allow administrators to effectively log into that user’s account and see BrainHQ as they would see it. Please be aware that any training or settings changes made on their account while impersonating will affect the user’s record. To impersonate a user, hover over their row and look for the buttons that appear on the far right side of the row. Click the button with the eye to impersonate the user. This will open a new browser tab with a warning at the top, and the users name will be in large, bold print:
![]() Remember, you are acting as USER, and any actions you take, including training and settings changes, will affect that user’s record. To stop impersonating USER and return to your administrator account, simply close this tab.
Remember, you are acting as USER, and any actions you take, including training and settings changes, will affect that user’s record. To stop impersonating USER and return to your administrator account, simply close this tab.
![]() Move If managing more than one group, administrators can move users from group to group through the use of the Move button. Clicking the Move button will cause a prompt to appear where the admin can select which group to move the user to.
Move If managing more than one group, administrators can move users from group to group through the use of the Move button. Clicking the Move button will cause a prompt to appear where the admin can select which group to move the user to.